Here are some comments on the equipment I took on the Reunion Tour. Let's start off with some of the less-common bicycle components:
The possible third disadvantage is noise. The freewheel is quite loud when coasting, although only in gears 8-14 for some reason. To be fair, it is actually no louder than my old touring bike, which had a tandem rear hub, and that one was loud in all gears. Also, in gears 1-7 there is a noticeable grinding sound (actually more of a "whooshing" sound) when pedalling. It is loudest in gear 7 and gradually gets quieter and quieter as you go to lower gears.
To put that in perspective, if there is even one car in the vicinity the sounds are covered up by road noise. Still, they are quite evident when riding on a quiet country road and some people may find them objectionable.
| My old touring bike | ||||
|---|---|---|---|---|
| Teeth | 46 | 36 | 24 | Change |
| 11 | 113.8 | 89.1 | 59.4 | 9.1% |
| 12 | 104.3 | 81.7 | 54.4 | 16.7% |
| 14 | 89.4 | 70.0 | 46.7 | 14.3% |
| 16 | 78.3 | 61.2 | 40.8 | 12.5% |
| 18 | 69.6 | 54.4 | 36.3 | 16.7% |
| 21 | 59.6 | 46.7 | 31.1 | 23.8% |
| 26 | 48.2 | 37.7 | 25.1 | 23.1% |
| 32 | 39.1 | 30.6 | 20.4 | n.a. |
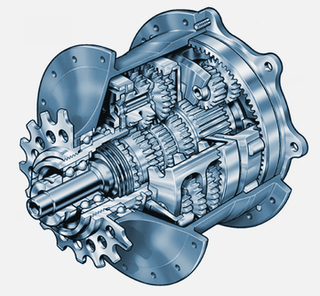
14 speeds may not sound that impressive compared to the 30 or 33 speeds possible with a modern derailleur system. However, there is a lot of overlap in those 33 speeds so the actual number of unique gears is similar to the Rohloff. In addition, with a derailleur the size of the jump from gear to gear varies quite a bit: some steps are bigger than others because the gear ratios can only change by an integer number of teeth on each sprocket. Through some magic of German engineering Rohloff has managed to make each shift have the same 13.6% change in gear ratio. And of course there is no overlap. The result is a very wide 5.26:1 gear range while avoiding any large jumps. I have never felt the need for an "in-between" gear and in fact often find myself shifting two or three clicks at a time.
As an example, my old touring bike had a wide-range derailleur system. The "gear inches" varied from 20.4 (granny gear) to 113.8 (high gear). The step size between adjacent gears varied between 9.1% and 23.8%. On the new bike with the Rohloff the gear inches go from 20.5 to 107.5 and each step is almost exactly the same 13.6%.
Shifting is instantaneous. You don't have to wait for the chain to derail from one sprocket to the other. That can be very useful if you forget to downshift for a hill and are having trouble building up enough momentum to get through the shift.
You can shift when not pedalling. This can be very useful if you stop unexpectedly and have to downshift before starting up again.
You don't have to worry about over-shifting and dropping a chain or experiencing "chain suck". It is impossible to be cross-chained. The chain lasts longer with a Rohloff since the chain line is always perfect.
In fact, the entire transmission is more reliable because all the delicate parts are sealed inside the hub, safe from damage and from the weather. The only maintance required is to change the oil once a year or 5000 km, whichever comes first.
On a derailleur-equipped bike, there are multiple adjustments that must be accurately tweaked or it won't shift properly. There are only two adjustments on the Rohloff and even if they are mis-adjusted it will still shift just fine. The visual gear readout may be off and the shifter may feel a little sloppy, but the shifting will still be perfect.
Here's an advantage I hadn't thought of before I ordered the Rohloff. With a derailleur, there is a cluster of sprockets on the right side of the rear wheel. To make room for them, the spokes on that side are at a very steep, almost vertical, angle. The term for this is "wheel dish". Because of wheel dish, the spokes must be very tight on the right side and very loose on the left side to keep the rim centered. That is why when you break a spoke, it is almost always on the rear wheel. There is no wheel dish with a Rohloff hub so the rear wheel is much stronger.
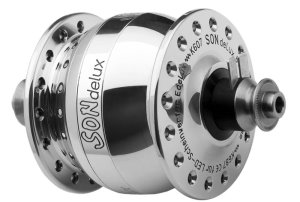
To convert the 6 VAC from the dynamo to standard 5 VDC to power your cell phone or other devices you need a USB converter. I bought mine from bike2power.com, but they seem to be out of business. (Their web site has been down for "maintenance" for months.) You can read this article for some other suggestions.
You will probably find that it doesn't work to charge a cell phone directly from the converter because every time you stop or slow down the voltage goes away, which confuses the cell phone. The answer is to charge a battery with the dynamo and converter and then charge the cell phone from the battery. The one I use is a Mophie Mini, but there are lots of others available at Walmart, etc. The same web site mentioned above also has suggestions on the best type of battery. They advocate the "pass through" type which can deliver power from the hub straight to the device, while also taking a charge if there's any power left over.
The wire from the generator (a twisted pair removed from a piece of CAT5 Ethernet cable) goes up the fork and inside the headset. There's a connector inside the headset which attaches to the USB converter wire, which exits through a hole in the headset cap. The converter itself is strapped to the bottom of the stem with black cable ties and its output cable goes into the handlebar bag, where the battery, cell phone, etc. are located.

I had pretty good luck with it. A couple of times the unit reset itself for no reason, which apparently is a known bug of the unit. You don't lose any data but you do lose all your settings so you have to go back and re-enter them. Also once or twice the unit froze and I had to cycle power to get it alive again. (If that happens, and you want to continue to record the ride, just ignore the screen that asks if you want to discard or store the data and navigate to some other screen.)
Another disadvantage of the Garmin is that the menu structure is rather complicated and non-intuitive. Adventure Cycling has a good web page on how to use this unit for bicycle touring. It is more useful than Garmin's own documentation.
All that said, I did find the Garmin to be very useful. I downloaded the Adventure Cycling GPX files so the Garmin would beep at me before every turn and show the turn on the display. You can zoom and pan the display, although the small screen doesn't really make it a substitute for a good paper map. You can upload each day's ride to Garmin Connect on the web and see all your data. The maps I posted for each day's ride on the Reunion Tour were cut and pasted from Garmin Connect (after cropping and editing with a simple graphics editor). The unit is waterproof and seems mechanically rugged. The quick-release is ingenious and works well.
Another disadvantage is that, as far as I can tell, it is not possible to use the light without also turning on the camera. The unit plays different little tunes to indicate its state, but the documentation doesn't give you the secret decoder ring to tell what each tune means.
I think on future tours I will just bring a standard bicycle headlight with a quick-release.
It will be smaller and lighter and I can also use it as a flashlight in camp.
The first time you pack the bike it will probably take several hours while you figure out how to get everything to fit in the case. But after you've done it a couple times it gets much faster. (Take photographs after you finish packing the first time to remind yourself how it fits the next time.) Their website has good instructions on how to do it.
In my experience, there is absolutely no effect on bike handling. It supposedly adds only 8 ounces
to the weight of the bike. I do have an issue with the down-tube coupling coming loose on one of
the other bikes, but that is the only one of the three that has had that problem. With the couplings
you get a special wrench to use for loosening and tightening them.
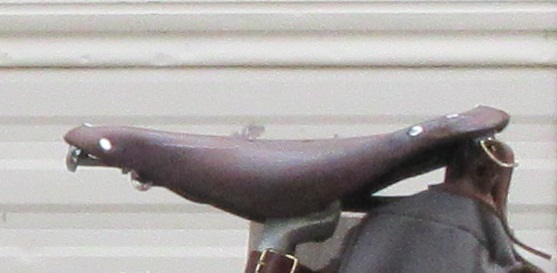
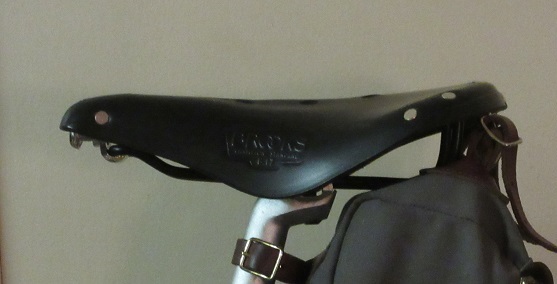
There is a great deal of mystique, not to say hype, about Brooks saddles. The story is that they are uncomfortable when new, but once you "break them in" they conform to your particular backside and are the most comfortable saddles out there. That has not been my experience. It is true that when you touch a new one with your hands it feels hard as a rock. If you tap your finger on the leather, it is like tapping hard plastic. But you don't actually want a super-soft saddle for long rides. Your sit bones sink down and the cushion presses up against the prostate.
But to break the leather in to the shape of your butt you would have to always sit in the same spot on the saddle. I think I'm like most riders in that I move around - sometimes I sit toward the front, sometimes toward the back. Which position is the saddle supposed to conform to?
The leather does stretch with time and tends to sag in the middle. (See top photo above.) This can be rather comfortable until it gets excessive. By then the leather-tensioning adjustment bolt (on the left in the photos) is about at its limit and the saddle needs to be replaced.
The leather is suspended in front and back and hangs between the two points like a hammock. It has a certain springiness that acts like a shock absorber when you hit a bump.
So although I don't buy into the hype, I do like the Brooks saddles. One reason is that they
tend to be a bit wider than most saddles, which fits me better. (I'm 200 cm, 6 ft 7 inches
tall.) The firm surface allows the sit bones to be firmly supported, which reduces pressure
on the prostate, and the springiness of the suspended leather absorbs road vibration.
On the other hand, Brooks saddles are heavy and rather expensive. You pay your money and you
make your choice.
Last updated November 22, 2021